
FAQ
Frequently asked. Clearly answered.
Everything you need to know before travelling to Japan
SETUP GUIDES
Install your MugenSIM eSIM
After you order, MugenSIM sends eSIM install details by email, including a QR code. On iPhone you can add the plan in any of these ways:
Method 1: Scan with the Camera app
Open Camera and point it at the QR code. When the Cellular Plan banner appears, tap it and follow the prompts to add the plan.

Method 2: Scan from Settings
Step 1: Open Settings.
Tap Settings > Cellular > Add eSIM > Use QR Code.
Step 2: Scan to add.
Use the on-screen camera frame to scan the eSIM QR code from your email.

Method 3: Use the installation link
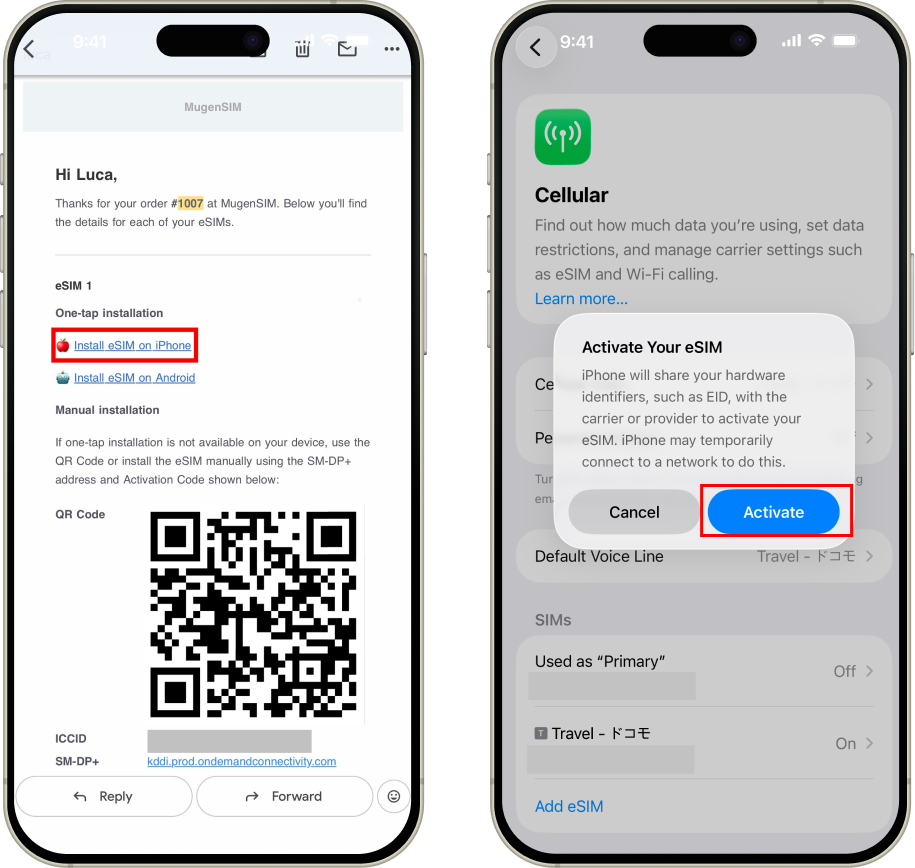
Once you receive the instructions by email, click on the installation link, and you will be prompted directly to a page where you will be asked if you want to activate your eSIM.
Tap install eSIM on iPhone > Activate
IMPORTANT NOTE
If the connection settings do not finish successfully, do not delete the eSIM or QR you already registered. Once an eSIM profile is removed, that same QR code usually cannot be used again.
Step 1: Check your email.
Open the MugenSIM message that includes your eSIM details.
Step 2: Open Settings.Tap Settings > Cellular > Add eSIM > Use QR Code > Enter Details Manually.
Step 3: Enter the activation details.
Type the SM-DP+ Address and Activation Code exactly as shown. Avoid extra spaces or characters.

IMPORTANT NOTE
If the connection settings do not finish successfully, do not delete the eSIM or QR you already registered. Once an eSIM profile is removed, that same QR code usually cannot be used again.
Long-press the eSIM or QR code
This path works on iOS 17.4 and later. After you order, MugenSIM emails your install and activation details. Press and hold the eSIM QR code in that email, then tap Add eSIM in the menu that appears.

IMPORTANT NOTE
If the connection settings do not finish successfully, do not delete the eSIM or QR you already registered. Once an eSIM profile is removed, that same QR code usually cannot be used again.
After you order, MugenSIM sends eSIM install details by email, including a QR code. On anrdoid you can add the plan in any of these ways:
Method 1: Scan with the Camera app
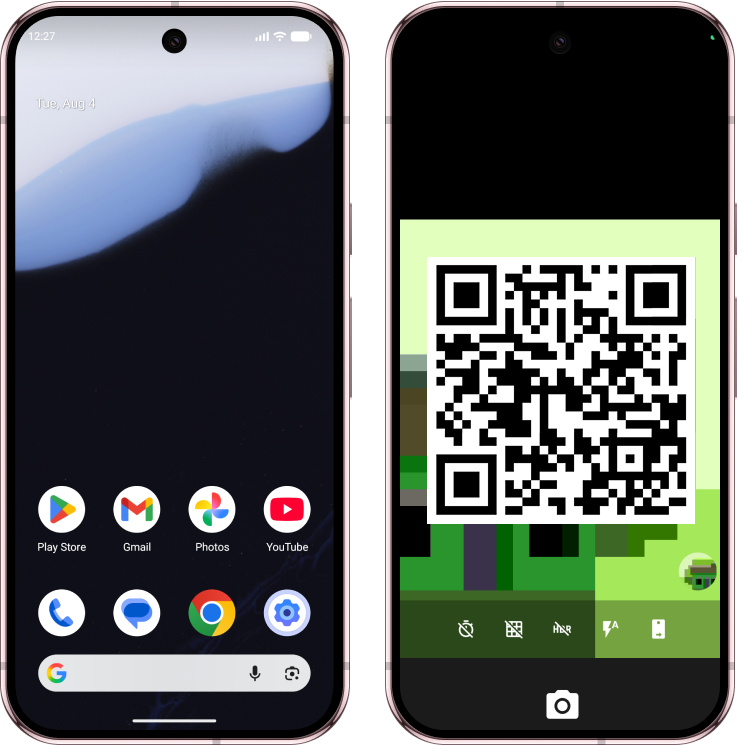
Open the camera, scan the QR code, then tap "Add plan" to your phone (wording can vary by brand).
Method 2: Scan from Settings
Step 1: Open Settings.
Tap Settings > Cellular > Add eSIM > Use QR Code.
Samsung Galaxy:
Settings > Connections > SIM manager (or SIM card manager) > Add eSIM (or Add mobile plan) > Scan QR code from service provider / Scan carrier QR code / Add using QR code.
Google Pixel:
Settings > Network & internet > Mobile network or SIMs, then use the + control to add a plan.Other Android phones:
Labels differ by brand, but the path is usually Settings > Mobile network > SIM list > Add eSIM, or the + control in mobile network settings.
Step 2: Scan QR code.
If asked, choose Download a SIM instead? or Don't have a SIM card?, tap Next, then scan the QR code from your email.

Method 3: Use the installation link
Once you receive the instructions by email, click on the installation link, and you will be prompted directly to a page where you will be asked if you want to activate your eSIM.
Tap install eSIM on Android > Activate

IMPORTANT NOTE
If the connection settings do not finish successfully, do not delete the eSIM or QR you already registered. Once an eSIM profile is removed, that same QR code usually cannot be used again.
Open Settings and go to your mobile network or SIM manager, then choose add eSIM. Look for Enter details manually (or similar). Enter the SM-DP+ Address and Activation Code from your MugenSIM email. Avoid extra spaces, then confirm.
Button labels differ on Samsung, Pixel, and other brands. If you only see a QR scanner, check under the viewfinder for a manual entry option.
IMPORTANT NOTE
If the connection settings do not finish successfully, do not delete the eSIM or QR you already registered. Once an eSIM profile is removed, that same QR code usually cannot be used again.
Step 1: Tap Continue to activate.
After you add the plan with the installation link, the QR code or by entering details manually, your phone opens the eSIM activation screens. Keep tapping Continue until activation finishes.r phone opens the eSIM activation screens.
If you see “Activating…” or “Unable to activate eSIM”
Activation may have failed because your device isn't connected to a Japanese mobile network. Please try activating it again once you've arrived in Japan and are connected to a local carrier. In the meantime, please don't delete it.
If you see “This code is no longer valid"
You may also see Cannot add eSIM. This code is no longer valid. In most cases the eSIM was already added and will appear in your SIM list.
Step 2: Label your eSIM
After activation you usually land on the SIM list. The new eSIM is often near the bottom with a default name such as Travel. You can rename it anytime: open that eSIM and enter a custom label in the CUSTOM LABEL field.
Step 3: Choose default line and cellular data
For data on the travel eSIM, disable data roaming on the line you are not using for Japan data, following your phone's Cellular / Mobile data settings for iPhone or Android (Pixel and similar).
Default line: choose Primary Line for calls
iMessage & FaceTime: choose Primary Line so your home number stays on those services.
Mobile data: before you arrive, keep your original SIM. After you arrive in Japan, select the new MugenSIM eSIM. Turn on Allow Mobile Data Switching if shown.
IMPORTANT NOTE
If the connection settings do not finish successfully, do not delete the eSIM or QR you already registered. Once an eSIM profile is removed, that same QR code usually cannot be used again.
Before you travel to Japan, turn off roaming on your existing SIMs. Some carriers start charging the moment your phone connects to a Japanese network. Your MugenSIM plan starts from the moment it connects to the Japanese network.
COMMON QUESTIONS
Everything else people ask
Most phones released since 2018 do, including iPhone XS and later, and most Samsung and Google Pixel flagships from the same period onward. Check your device compatibility now by clicking here.
Yes. Coverage runs on KDDI's native network, which extends through rural regions, mountain trails, and smaller cities, not just the major metro areas. To know, more please check the Coverage section on our website by clicking here.
Yes. From the moment you receive your eSIM, you have 180 days to install it. It stays inactive until you land in Japan.
Once you connect to the operator's network in Japan. Plans run on Japan time (JST), from 00:00 JST to 23:59 JST. Connecting later during the day means you will have less than 24 hours on the first day you connect.
Nothing. MugenSIM runs as a second, data-only line alongside your existing SIM. Calls and texts keep coming through your normal number.
Add another data pack from inside the same account you used to buy the original plan. No new QR code, no reinstalling anything.
Plans are valid for the number of days stated at purchase and don't roll over past expiry. We recommend timing your plan's start date to your arrival.
MugenSIM eSIMs are digital products delivered instantly. Once an eSIM has been issued, it cannot be returned, revoked, or resold. For this reason, purchases are non-refundable.
Please ensure your device supports eSIM technology before completing your purchase by clicking here. If you have any questions before ordering, our team is happy to assist.Please refer to our FAQ page and LinkedIn group for more help.